August 2026 highlights
A month that pushed on two fronts. In Base, advocacy grew a company-level view: accounts now carry their own point balances, the advocate portal can greet people with their company’s data, a live community feed reached the portal home page, and the social wall became something you can genuinely brand. In EverAfter (by Base), targeting got a reusable primitive in Audiences, list items learned to hide themselves from accounts they do not apply to, an AI assistant can now read your workspace through the new MCP server, and AI Documents completed its rollout from builder to journey step.
Points at the account level
Advocacy has always been measured per person. This release gives the company its own balance, and lets the portal greet an advocate with it.
Every account now has its own point balance
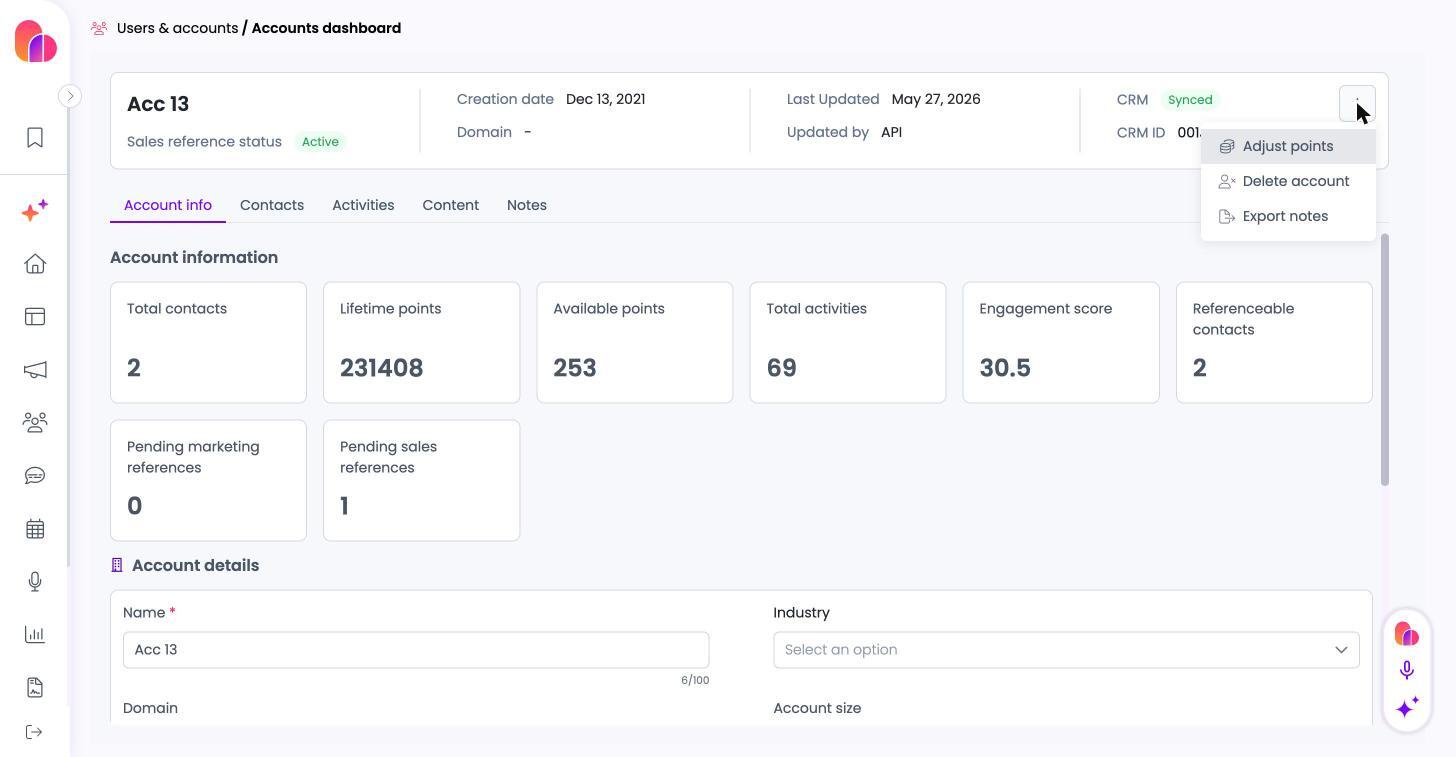
Accounts carry two new native attributes rolled up from their contacts: Lifetime points and Available points. They appear as two more tiles in the existing Account information row, beside Total contacts and Engagement score, and from there they behave like any other account attribute: account list columns, custom reports, account attributes, audiences and segmentation, the data sync module, and the API.
Points lived only on individual contacts. A program could see that one champion had earned 4,200 points, but nothing told it what the company as a whole had contributed. Reporting on account-level engagement, or letting an account redeem as a company, meant exporting contacts and adding them up by hand.
It turns advocacy into something you can measure, segment, and reward per company rather than only per person. The totals refresh when something changes rather than on a schedule, so a contact earning, redeeming, or being removed moves that account within seconds, and an admin’s own adjustment shows immediately.
Set the rules once: Customize → General settings → Account points. Two choices. First, when a contact redeems a reward, what happens to their account’s Available points? Keep them (the default) means the account keeps everything its contacts ever earned, so contacts and accounts redeem from separate pools. Reduce them mirrors the contacts’ live balance on the account instead. A scheduled points reset follows the same choice, because it is the same thing happening in bulk. Second, when a contact is deleted, do their points stay on the account or come off it?
Adjust one account: open the account’s actions menu and choose Adjust points. It is the same dialog you already use for a contact: a direction, an amount, which number to affect, and a required reason.
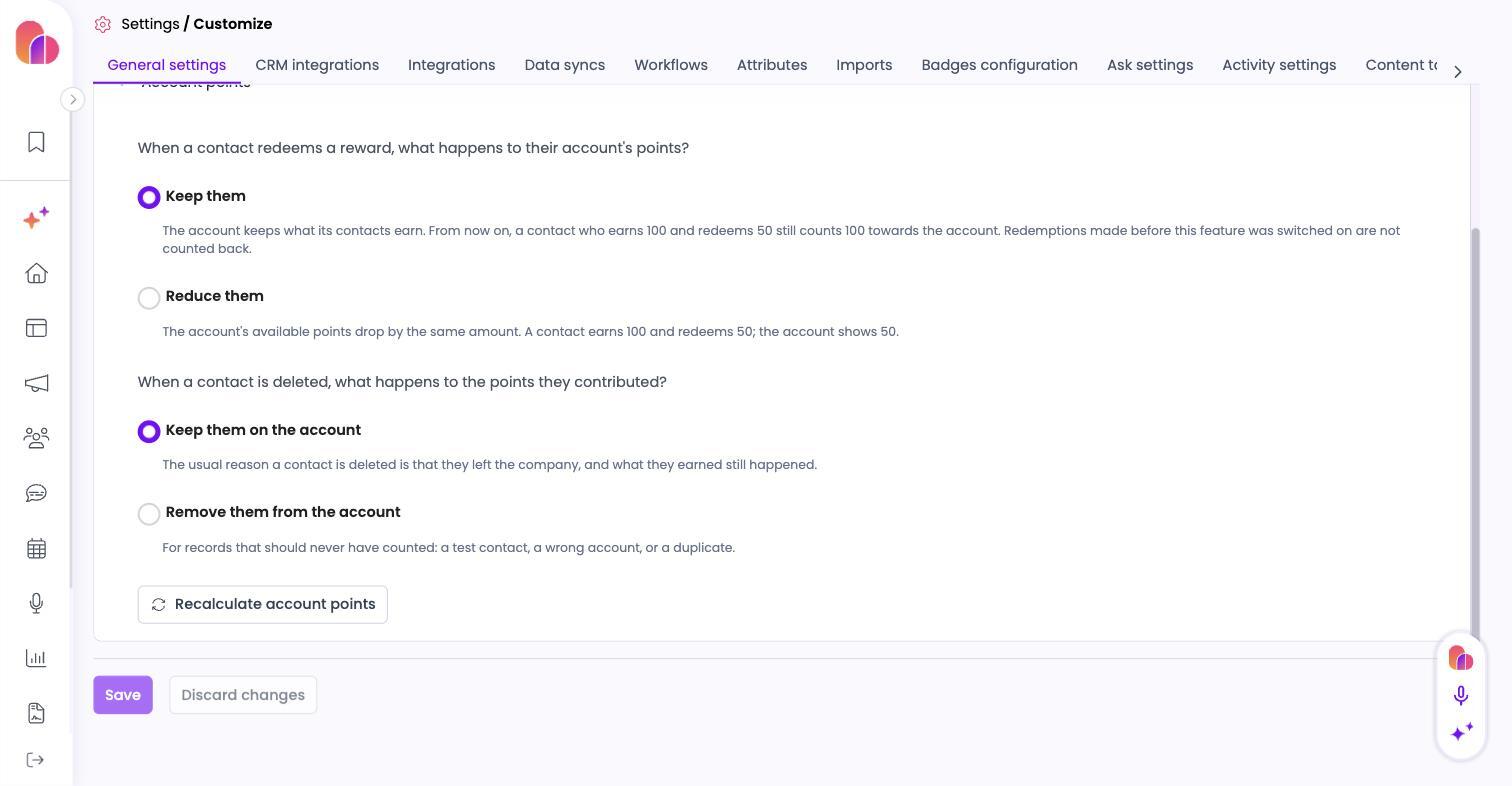
The deletion rule defaults to Keep them on the account, because the usual reason a contact is deleted is that they left the company and what they earned still happened. Remove them from the account is for records that should never have counted: a test contact, a wrong account, a duplicate. Redemptions made before the feature was switched on are not counted back. Every account-level change is logged in the account’s Activities tab under the Account adjustments activity type, with the amount, the reason, who did it, and when. After changing either rule, use Recalculate account points so every account follows it; expect the numbers to move visibly. One combination is not supported: an account redeeming points cannot reduce its contacts’ balances.
Greet advocates with their company’s data, not just their own
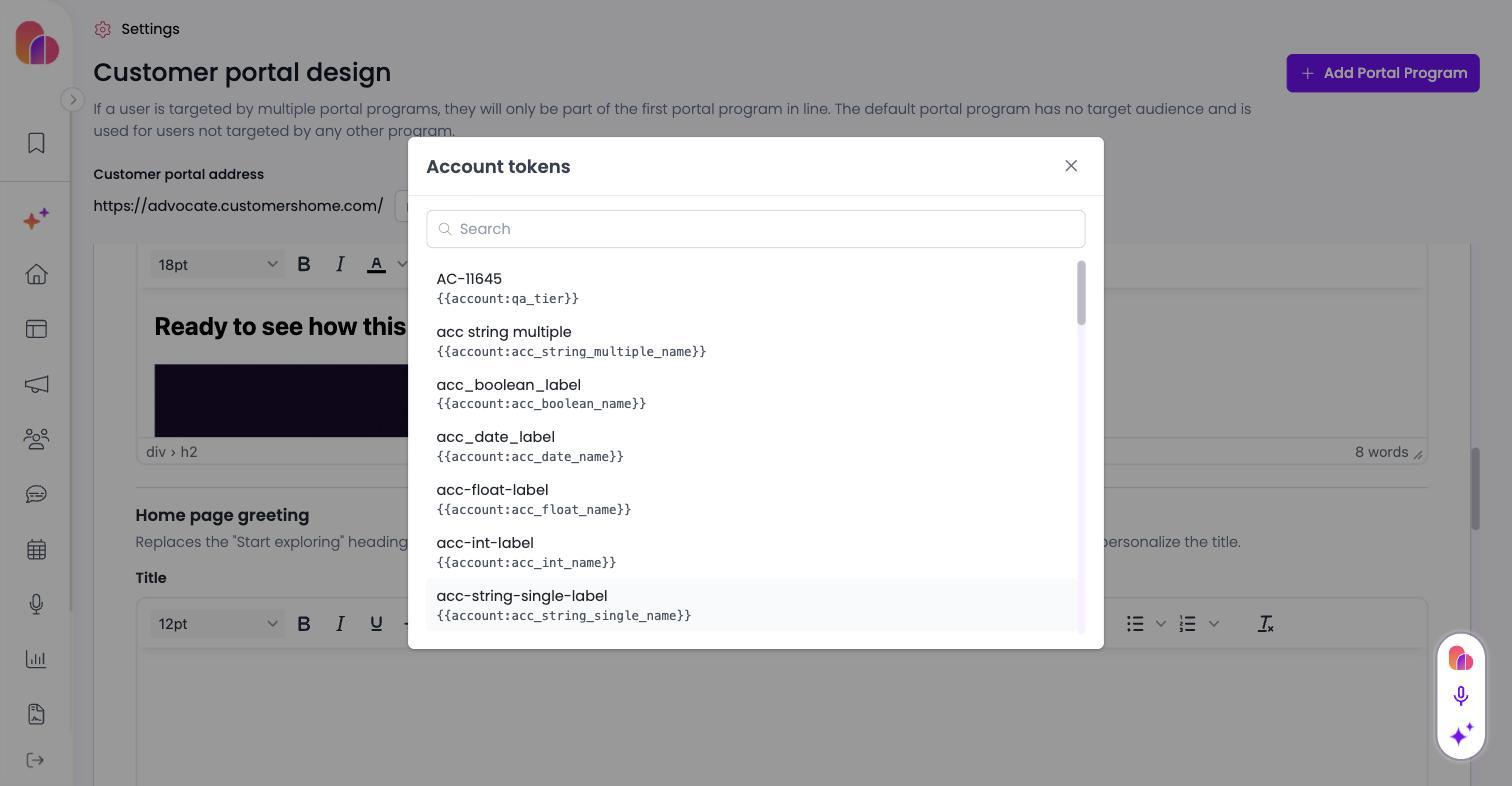
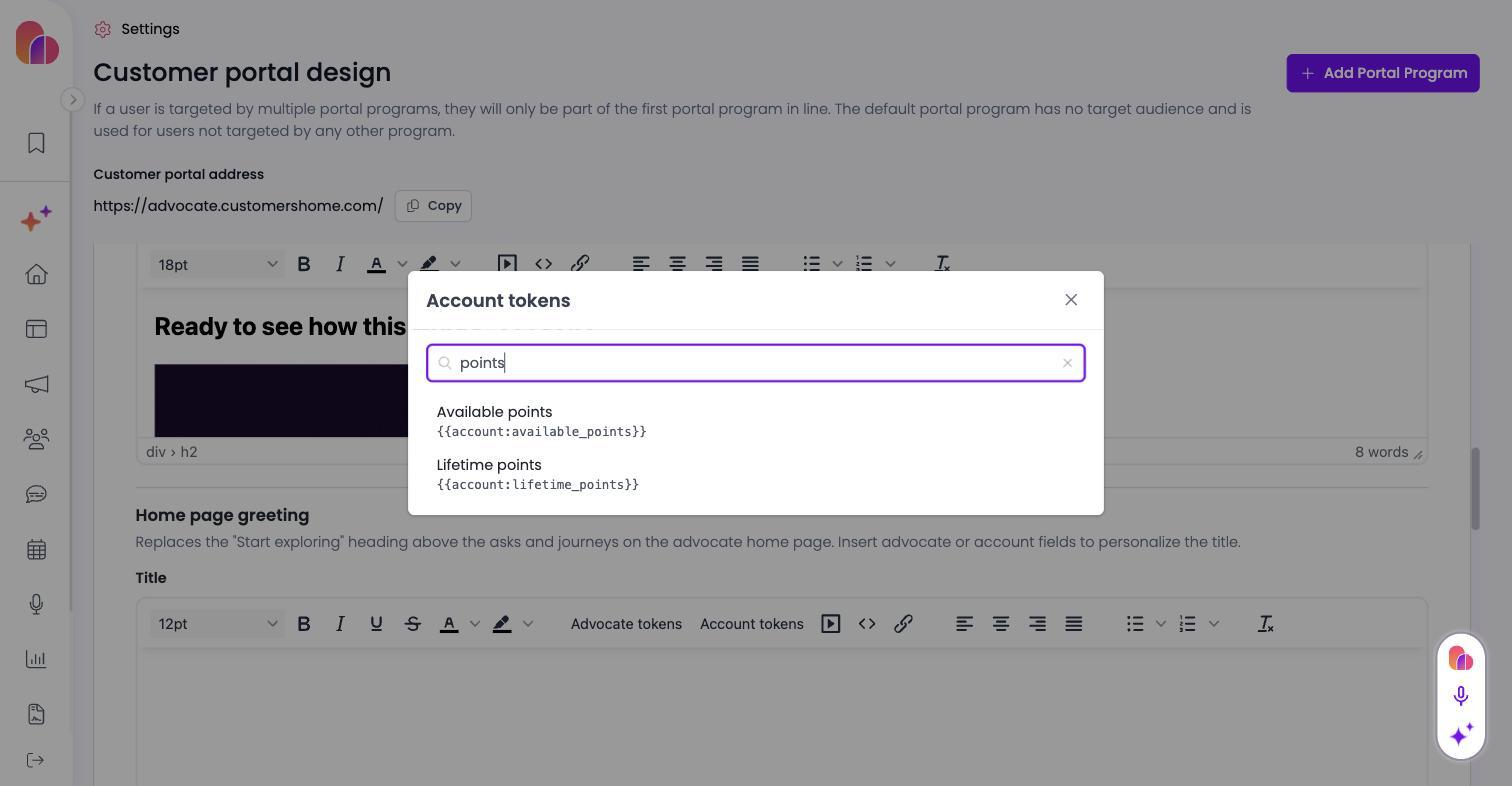
The greeting area on the advocate-portal home page could already be personalized with the advocate’s own details. It now offers the advocate’s account as well: every native account field, every custom account attribute, and the new account Lifetime and Available points. The field keeps its Advocate tokens button and gains an Account tokens one beside it, so the two sets never get confused. Each picker is searchable, sorted alphabetically, and lists every field by the display label you know it by.
The messages admins actually want to write are usually about the company. “Your team has earned 12,400 points this year” or “Your account tier is Gold” simply could not be written before, because the picker only knew about the person reading it.
Customer portal design → pick the program → Messaging → Home page greeting, then click Account tokens and search for the field you want. Everything else is unchanged: per-advocate resolution, per-program configuration, blank rendering when a value is missing, and the default “Start exploring” heading all behave exactly as they did.
A live community feed on the advocate home page
Advocates now see a Community card on their homepage: four posts from their spaces, with a Latest (newest first) and Trending (most replies) toggle. Each post shows the author, time posted, title, preview, space, and reply and reaction counts. Click through and it opens in the existing Community tab, in the same browser tab. Getting it on the page is an admin setting: Leaderboard, My badges, My level and the new Community card all live in one reorderable, per-portal list, each toggled independently.
Advocates already had a full community behind the Community tab. Their homepage just never mentioned it, so the page they open first gave them no reason to go there.
The goal is more community traffic and participation. Real posts, not just a link, on the page advocates open first give them a reason to click through, and each portal decides where that invitation sits instead of it being hardcoded.
Turn it on: Customer Portal Design → pick the portal → General settings → Home page cards. Drag to reorder and toggle the Community card on. It is off by default, and needs a community connected to the account, the same condition the Community tab already uses.
Customize the copy (optional): same place, under General settings → Community feed card. Set the Card title (default “Community highlights”) and Button label (default “Explore the community”). Leave either blank to use the default.
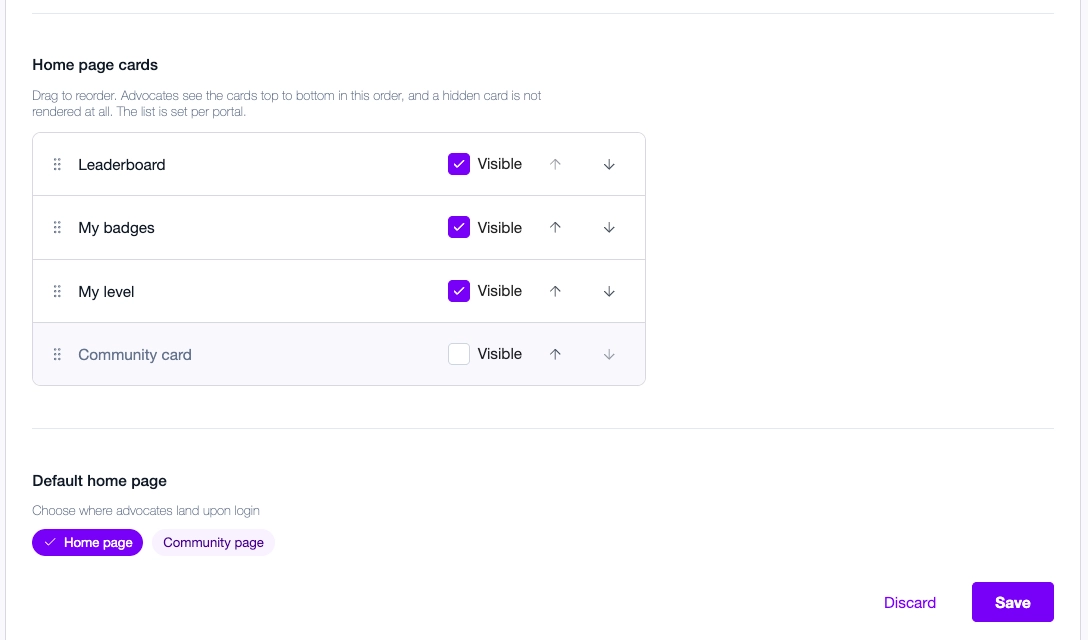
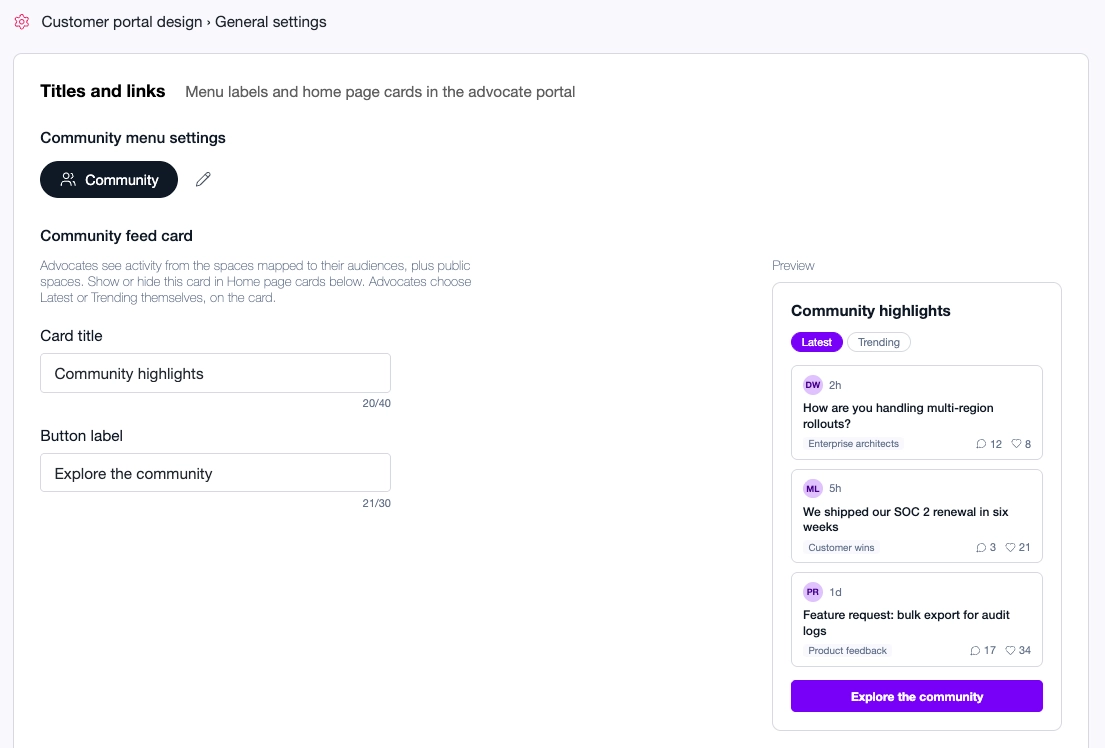
The old “Hide the levels board” checkbox is gone. My level’s visibility now lives in this list, carrying over its previous value. Leaderboard and My badges default to visible. Feed data is cached for up to 24 hours. Advocates with no mapped community audience still get a feed of public spaces rather than an empty card. Card and button colors follow the portal’s branding.
Brand the social wall: logo, fonts, and your own empty state
Five things that were hardcoded are now per-wall settings. Show Logo puts the company’s stored logo in the header beside the company name. Logo Size offers Small (48px tall, the default), Medium (72px) and Large (112px), with width following the logo’s own proportions, using the same three names as the hosted login page. Show Company Name can be turned off so the logo stands alone, centered. Font Family picks from the fonts already offered for other customer-portal elements: Poppins, Open Sans, Roboto, Montserrat, Bebas Neue. And Empty State Message is now your own text for when nothing matches the selected filters.
The wall header always rendered an initials box built from the first two letters of the company name, so “Contoso University” showed up as “CO”. It was never a logo, and there was no way to make it one. Headings rendered in one fixed font on every wall, and a filter that matched nothing showed every customer the same fixed line, “No evidence items match your filters.”
A social wall is often embedded on the customer’s own site or put on a screen at their event. It has to look like their page, not like a generic feed, and the header is the first thing anyone reads.
Exactly like every other wall setting: say what you want in the Content Generator, and the agent prints the wall’s full configuration back to you so you can confirm it. Settings you do not mention stay as they are.
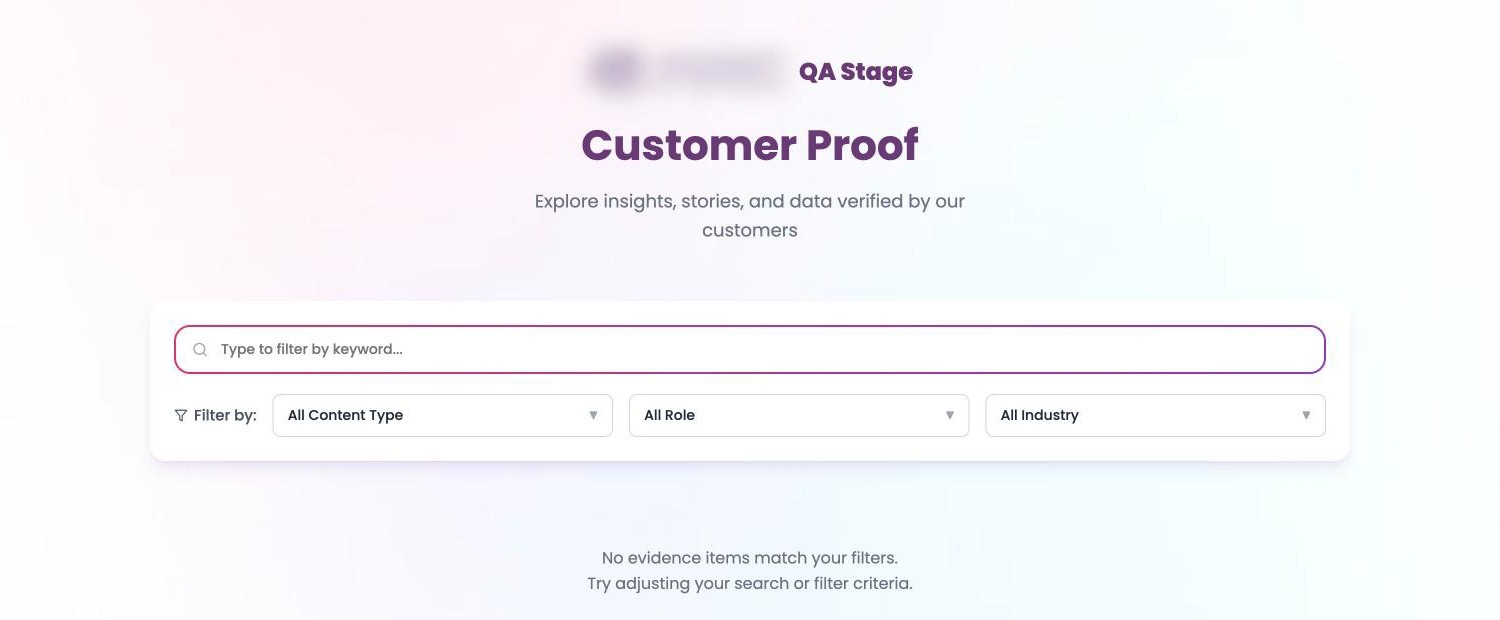
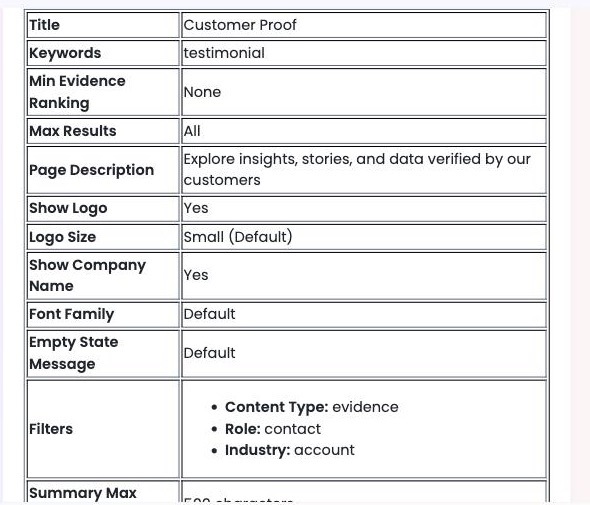
Wide wordmarks stay contained: height drives the size, but width is capped so a long logo cannot stretch across the header, and a logo that hits the cap scales down proportionally rather than being cropped. On narrow screens the logo shrinks with the page title, so Large never dominates a phone. If the company name is hidden and no logo is available, the brand row is simply left out and the page starts with the section title, which is a valid configuration rather than an error. Several settings customers often ask for already exist and only need to be set on the wall: section title and description, author name format, showing the company name under the author, custom attributes beside the author or company, card footer, summary length, which filters appear and what they filter on, content keywords, minimum content quality, maximum items, and auto-refresh.
Ask an AI assistant about your EverAfter workspace
EverAfter now ships a read-only MCP server. Connect it to Claude, or to any assistant that speaks MCP, and the assistant can read your workspace directly: accounts and their fields, tasks and task statuses, events and event types, custom objects and their records, hubs and assets, and data points. Seventeen read tools in total, scoped to a single workspace.
Answering “which accounts in onboarding have no completed tasks this month?” meant building a report, exporting a CSV, or asking someone with warehouse access. The data was all there; getting a question to it was the slow part.
It puts the workspace behind the assistant your team already has open. A question that used to become a ticket, a report request, or a spreadsheet becomes a sentence, and the answer comes back against live data rather than last night’s export.
Read-only by design. There is no tool that creates, updates or deletes anything, so an assistant cannot change your data. Access is scoped by workspace, and everything the assistant can see is what that access already allowed through the API.
Audiences: define a segment once, use it everywhere
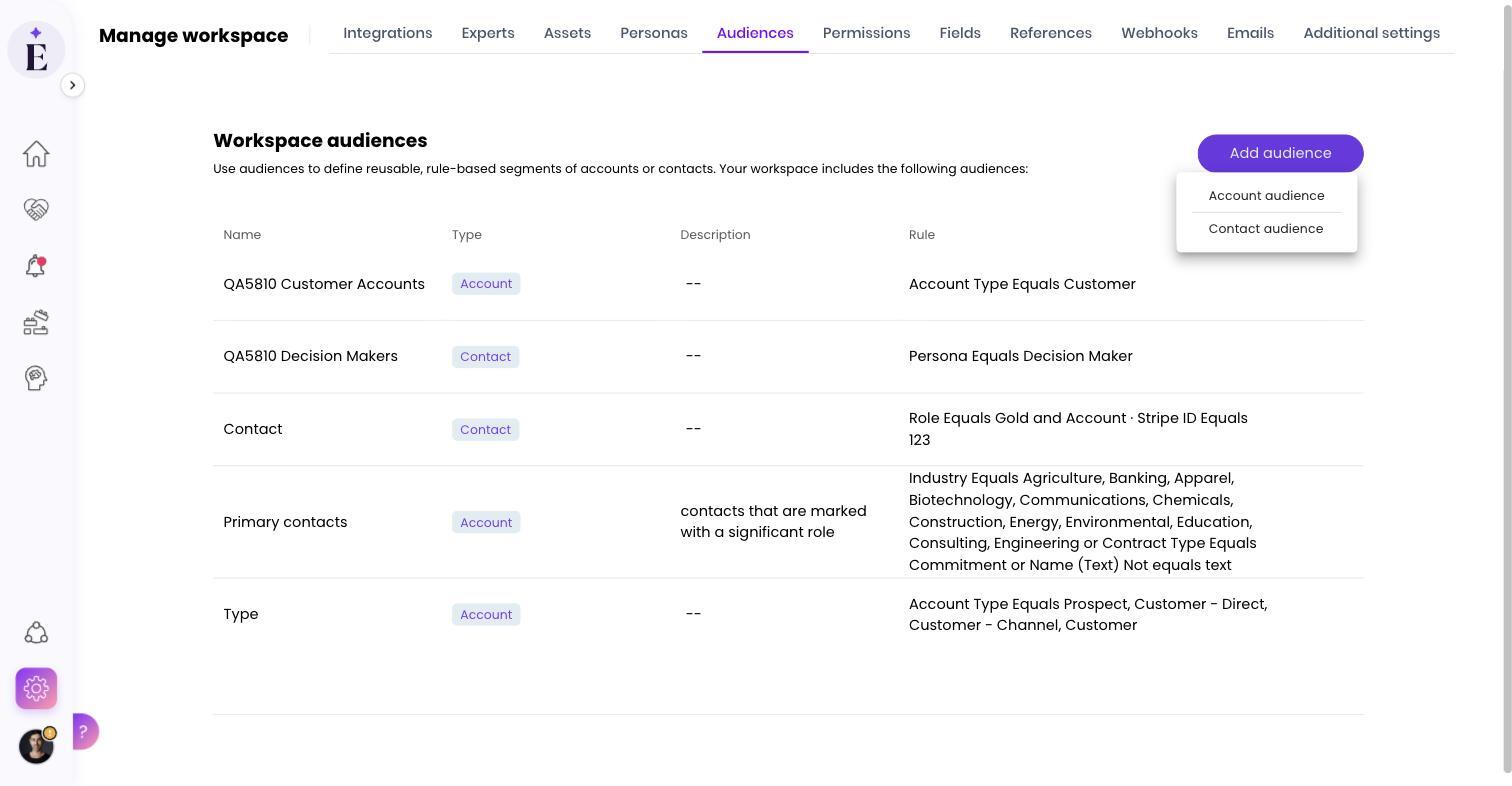
Audiences are named, reusable, rule-based segments of your accounts or contacts. “Enterprise accounts in onboarding”, “Champions with a renewal in the next 30 days”. You define one in Manage Workspace → Audiences, check how many members it matches, and then reference it wherever targeting is needed: which widgets show on a hub, which accounts enter a journey, and which branch an account takes.
Targeting was scattered and could not be reused. Every widget and every journey step had its own persona picker and its own inline field filters, re-described from scratch each time, with no shared name for the segment and no way to see how many members a definition actually matched.
One definition, one place to change it. When “Enterprise” starts meaning something slightly different, you edit the audience and every hub widget and journey that references it follows. And because you can count an audience before you save it, you find out that a rule matches four accounts before you build a journey on top of it.
Build one: Manage Workspace → Audiences → Add audience, then pick Account audience or Contact audience. Rules are written in groups: every rule inside a group must match, and any one group matching is enough. Calculate accounts in group counts what a single group matches; Calculate accounts in audience counts the whole thing.
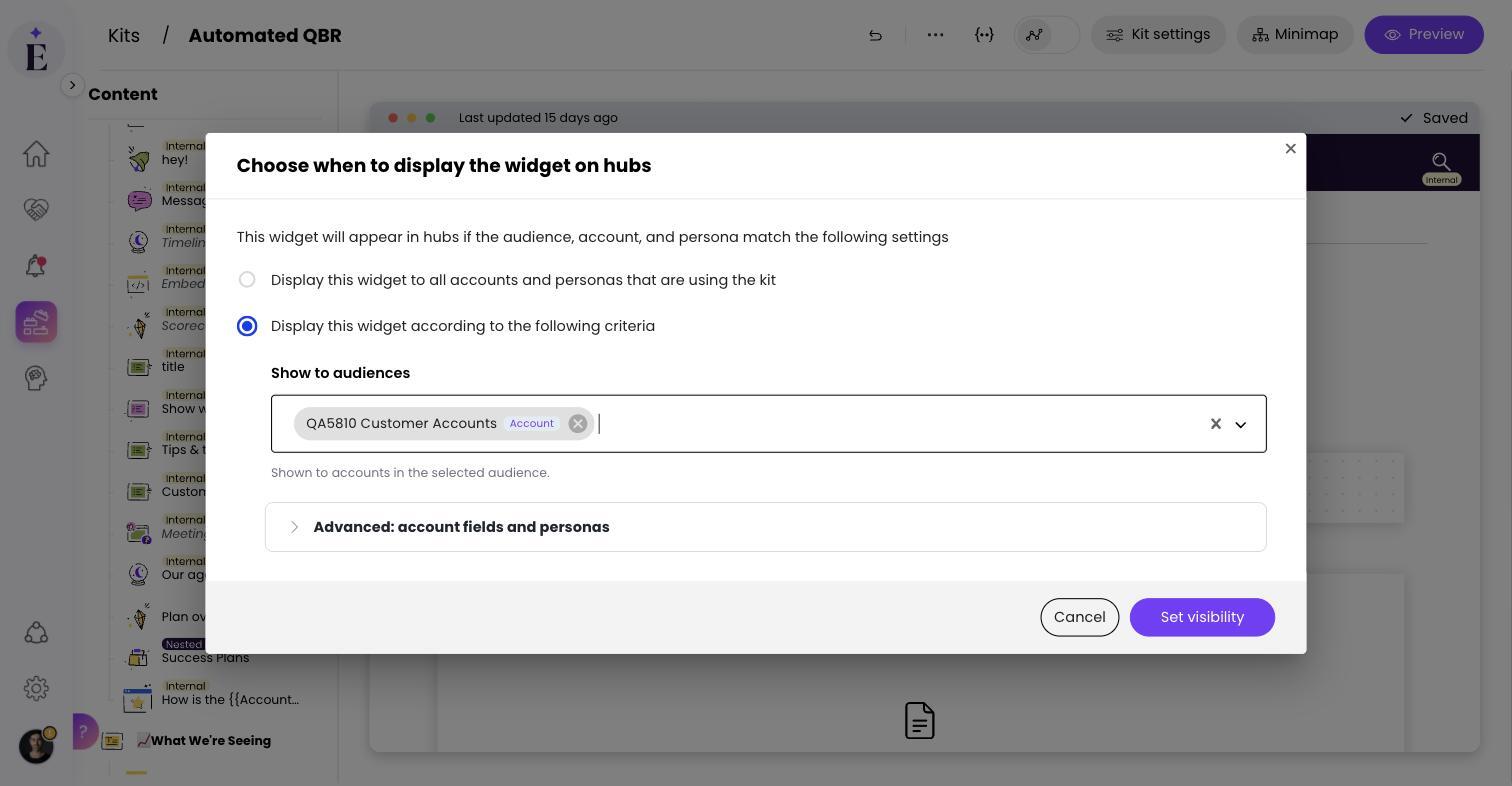
Use one: a widget’s visibility dialog now leads with Show to audiences, and the account-field and persona rules move into Advanced: account fields and personas beneath it. In an account journey, an Account audiences section appears on the entry rule and on every branch, with the existing filters reframed as Advanced.
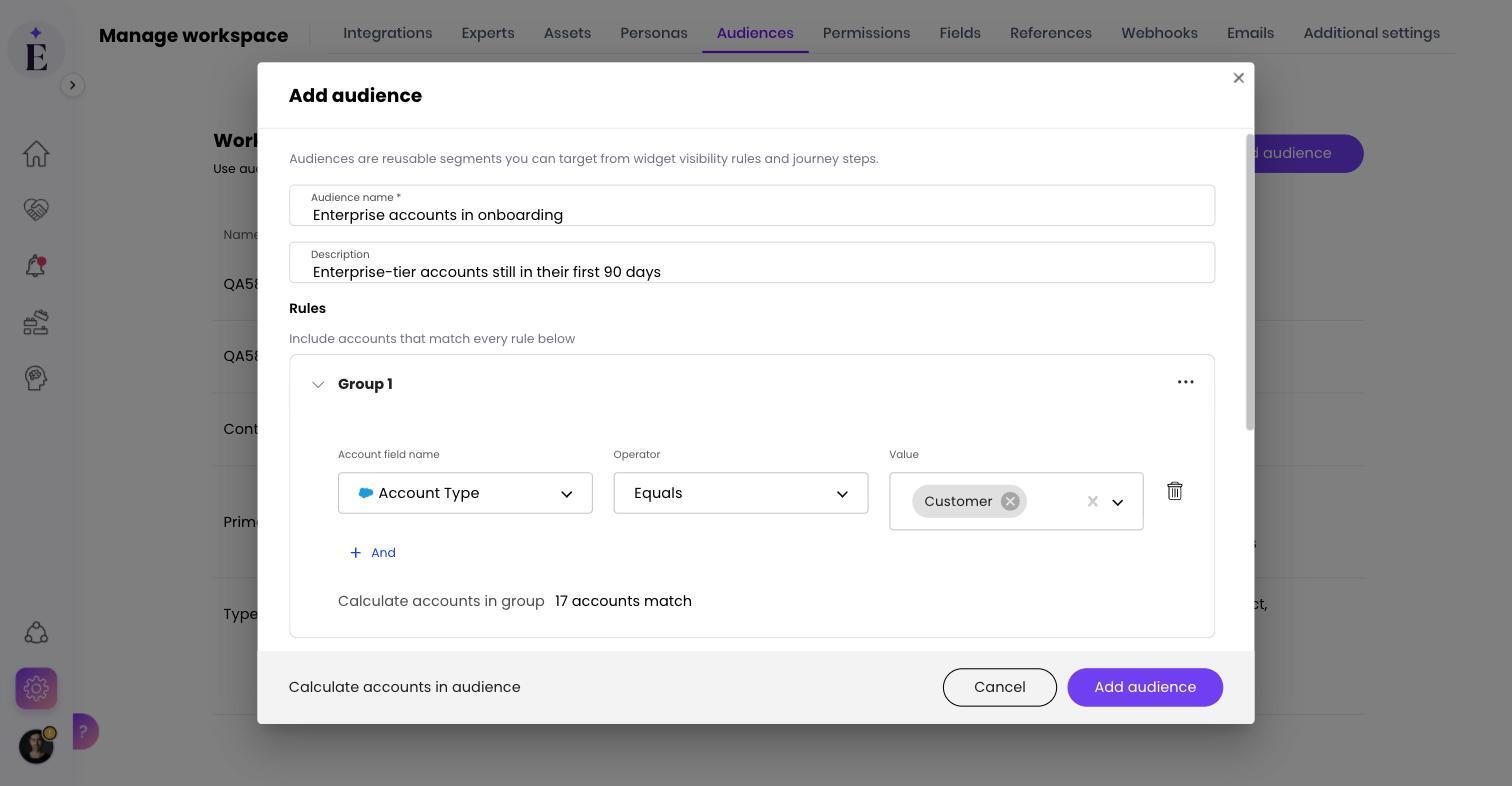
Membership is evaluated live, at read time, so an audience always reflects who matches right now and there is no member list to refresh. A rule on a CRM-sourced field reads the value the CRM holds at that moment, not the value at last sync. Audiences combine additively: within a type any one match is enough, across types both the account and the viewing contact must match, and audiences are ANDed with any persona or field filter already on the object. An object that references only deleted audiences targets nobody rather than everybody, and the widget visibility dialog says so and offers to remove the stale reference. An audience’s type is fixed when you create it.
Show a list item only to the accounts it applies to
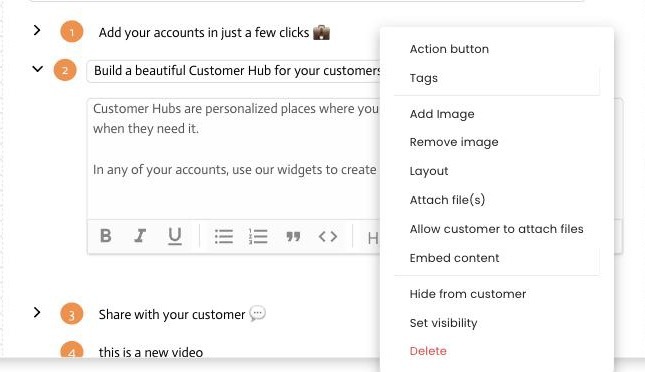
Every item inside a List widget can now carry its own visibility rules. Open the item in the kit editor, choose Set visibility from its actions menu, and pick between Display this item to all accounts that are using the widget (the default, and what every existing item does today) or Add this item according to the following criteria, which you build from account fields. On a customer’s hub, only the items that match that account appear.
One onboarding kit reused across many accounts left two bad options. Show every item to everyone, and most customers read steps that do not apply to them. Or keep a separate kit per segment, and multiply the upkeep every time anything changes.
One kit can now serve every segment. An “Enable SSO” step reaches only Enterprise accounts, an EU data agreement step reaches only EU accounts, and the kit stays a single thing to maintain.
In the kit editor, click into a List item to open it, then choose Set visibility from its actions menu. Rules combine with and, so the account has to match all of them. An item carrying rules shows a small visibility icon in the kit editor, and hovering it summarizes the rules in plain language, for example “Displays when Plan is Enterprise”. It is the same rule builder the todo list already uses for per-task visibility, with the same wording and the same operators.
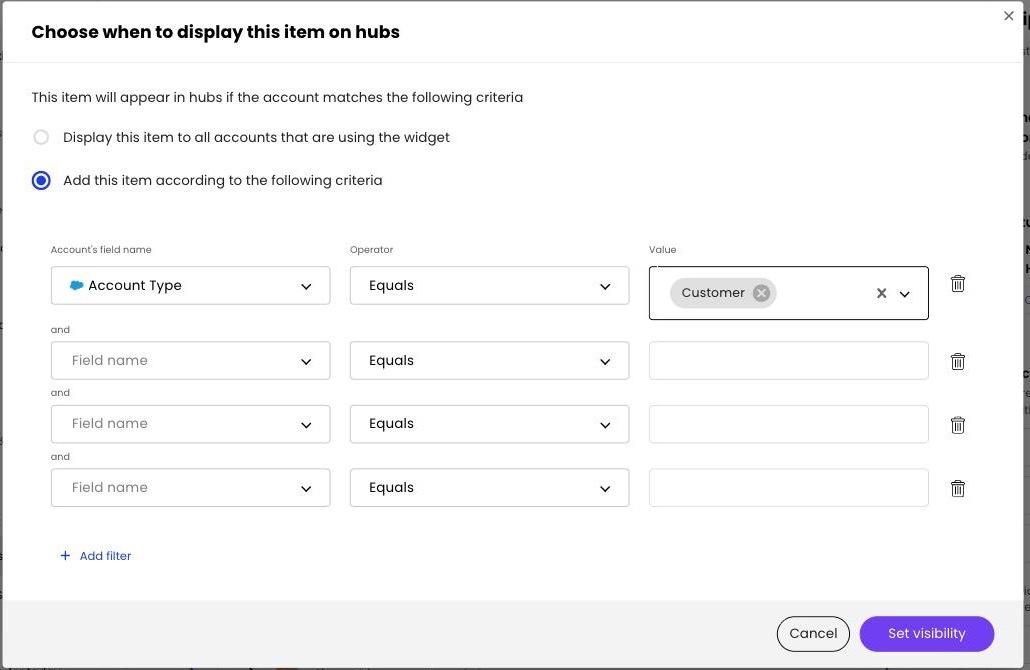
In the kit editor every item stays visible and editable regardless of its rules, because there is no specific account to evaluate against. On an individual account’s hub, non-matching items are hidden for everyone looking at that hub, the customer and your own team alike, and the customer never sees the rules or any trace of a hidden item. Rules survive a widget being customized on a single hub, they travel with the kit when you apply it somewhere new, and they apply in both the default rendering and a Studio Layout rendering. Nothing changes for an existing item until you set rules on it, and items a customer adds themselves always show to that customer. Widget-level visibility is unchanged and keeps working alongside this.
AI Documents is fully rolled out
Seven pieces shipped across five weeks. Individually they read as increments. Together they are the module: design once, generate per account, deliver on the hub, and eventually let a journey do it for you.
Design a page once, generate it per account
You design a page in Studio by describing what you want in plain language: a cover, a KPI panel, a table of the account’s open cases. You assemble those pages into a document and set which accounts see which pages, so one document serves your whole book. Then you pick the accounts and generate, and each PDF pulls that account’s real data at the moment you hit the button. The account name, the usage numbers, the open cases, the renewal date.
A QBR deck was an afternoon per account: copy last quarter’s file, pull fresh numbers from three places, paste them in, fix the formatting, and repeat. By the time the last one was done the first one was out of date.
The work moves from per account to per template. One design covers the book, and because the numbers are pulled at generation time rather than pasted in, a document is current the moment it is made.
The builder. Describe a page in Studio and the AI builds it, then order your pages and set per-page visibility rules.
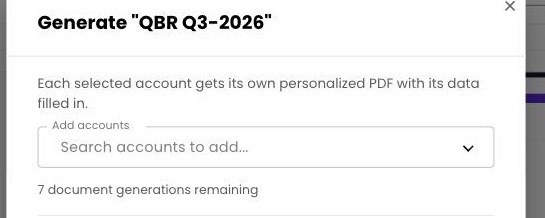
Per-account generation. Select several accounts and generate them together, each PDF filled with that account’s own data.
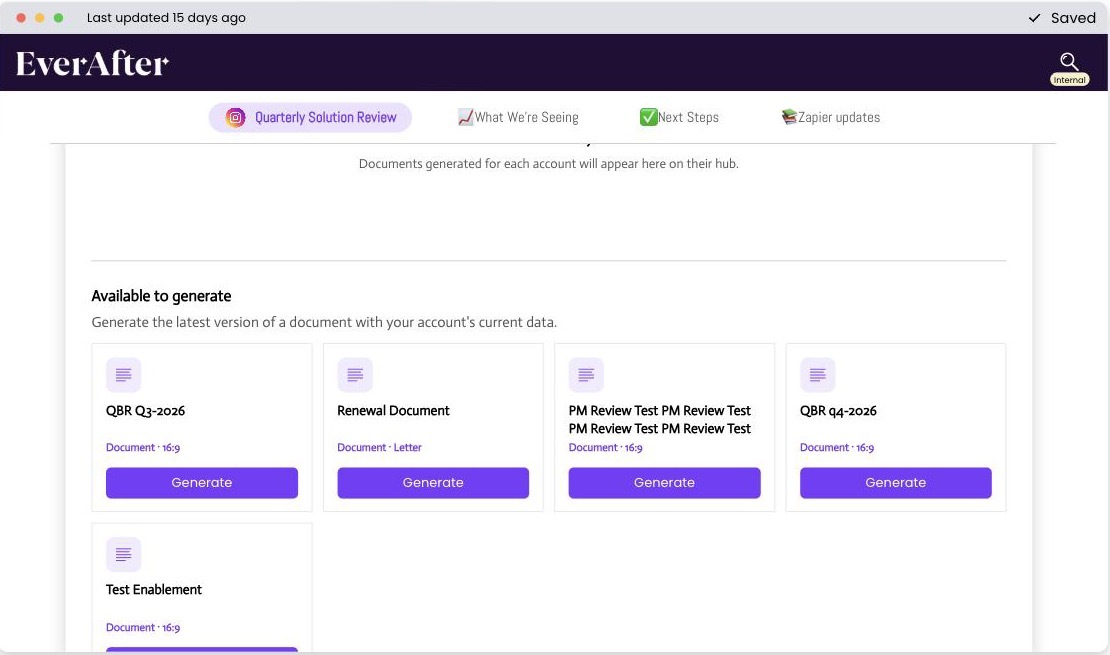
The Documents widget on the customer hub. Every generated file sits where the customer already looks, and you can let them generate approved documents themselves on demand.
A standalone mode, for workspaces that want documents without the rest of the platform.
Usage metering, with a clear allowance and a clear limit.
A Generate document step in Journeys, so the renewal document builds itself ninety days out with nobody clicking generate.
Plus a fix for pages backed by a data warehouse (BigQuery, Redshift, Snowflake, Databricks), which previously showed “No records for this account” in the builder preview.
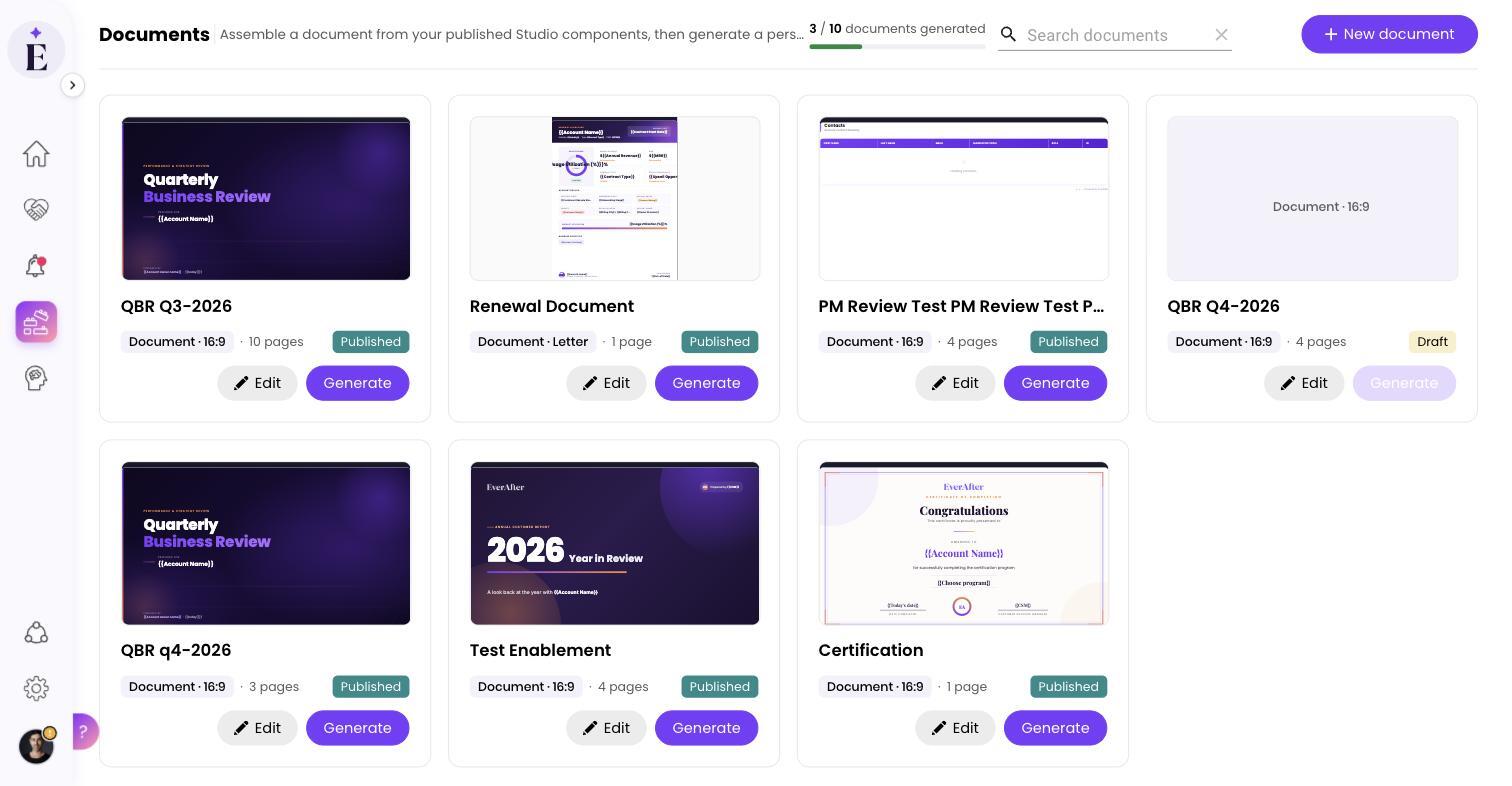
Start in Studio, describe the page you want, and let the AI build it. Assemble the pages into a document, then generate. The help center walks through the whole thing end to end.
Every workspace has 50 documents included through December 31, already applied, with nothing to switch on. Downloads from inside the builder are previews and do not count against the allowance, so you can iterate on a design freely.